Saturday, September 17, 2011

Friday, September 2, 2011
Wednesday, August 31, 2011
The Global Entrepreneurship and Maker Space Initiative (GEMSI)
The Global Entrepreneurship and Maker Space Initiative (GEMSI) is a project which focuses on encouraging the development of democratic maker communities to stimulate and support entrepreneurial endeavors. GEMSI’s first project is proposed to take place in Cairo Egypt starting October 2011. The political revolutions of the Arab Spring has initiated change to the Egyptian political landscape and laid bare the troubled economy that was underneath. The many years of authoritarian regimes has taken it’s toll on the entrepreneurial climate of the region.
GEMSI believes in the power of the Maker movement and in particular the empowering concept of Hacker Spaces. These spaces are community workshops that are democratizing innovation throughout the world. By providing their members the tools, collaborators, and access to a global pool of knowledge they are prototyping spaces of the future.
Hacker Spaces / Maker Spaces have recently experienced a dramatic growth throughout the world, going from a set of 50 which identified themselves on hackerspaces.org to over 1000 today. Sadly the developing world has not seen the same growth. It is this problem that GEMSI attempts to address.
Saturday, August 20, 2011
Project OSHAS video teasers!
Project OSHAS (Pronounced Ochase): Open Source Home Automation System
Our first major project that let the user be really in control of his house and to simply and easily configure rules (automation) that the house can follow instantly, It's Web-based and Wireless so anywhere you are, your in control
Here are some teaser videos:
Our very first attempt to control arduino with OSHAS website
Here we got a little geekier and decided to use a watch the we bought made by Texas Instruments, which is actually a micro-controller in the shape of a watch, and control what we can with it
Chronos Watch
http://processors.wiki.ti.com/index.php/EZ430-Chronos?DCMP=Chronos&HQS=Other+OT+chronoswiki
Controlling everything in the home like lights and air conditioner
Security alarm
OSHAS can be accessed through any smartphone , any screen size and everywhere in the world
Stay tuned for the full open source hardware and software
Friday, August 19, 2011
Controlling a robotic arm using Aruino and H-bridge.
We shoot this video while testing the arduino code and motors on the arm.
This project is built by Cairo Hackerspace member Ahmed Tohmay.
The Arduino source code and wiring diagram will be released soon.
This project is built by Cairo Hackerspace member Ahmed Tohmay.
The Arduino source code and wiring diagram will be released soon.
Monday, August 15, 2011

Tuesday, July 26, 2011
Project OSHAS

In our last post we explained the problems you may face when using the wifly from sparkfun, now we show you Where we used it..
Project OSHAS (Pronounced Ochase): Open Source Home Automation System
Our first major project that let the user be really in control of his house and to simply and easily configure rules (automation) that the house can follow instantly, It's Web-based and Wireless so anywhere you are, your in control
Here's a small teaser of someone walking in the house, opening the door and walking in ( motion detection) and the lights and air conditioner turn on automatically
Here we got a little geekier and decided to use a watch the we bought made by Texas Instruments, which is actually a micro-controller in the shape of a watch, Chronos Watch http://processors.wiki.ti.com/index.php/EZ430-Chronos?DCMP=Chronos&HQS=Other+OT+chronoswiki
and control what we can with it
Stay tuned for much more developments
Sunday, May 15, 2011
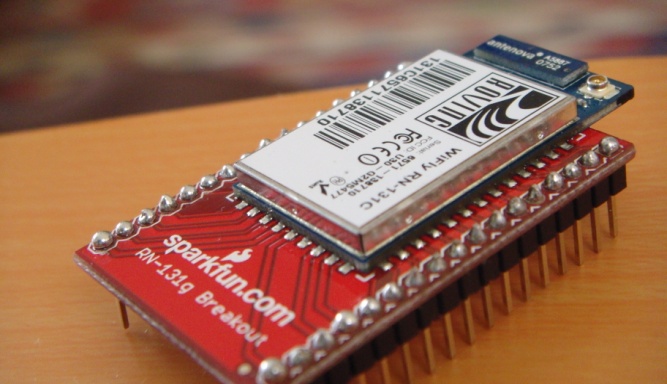
A beginner’s guide to connecting and operating the WiFly to Arduino Serially
We were working on a home automation project , we used the wifly gsx in our project .
When we bought it, we thought it will be easy to communicate it like a serial modem between the arduino and PC ,,, of course we are not noobs :) but every inch in the datasheet made us feel like one :)
And when we searched for a solution for even one of our countless problems we faced.... the result can be summarized in three words ... WIFLY NOT WORKING or we are noobs :D
Of course i am kidding :) ,,we are not noobs and wifly is WORKING :o , thanks to sparkfun wifly library and http://arduinology.tumblr.com/
We decided to start our new virtual hackerspace with this easy step by step tutorial for wifly :
Please post any problem you faced with wifly or arduino .
- First of all download the WiFly Serial Library from http://sourceforge.net/projects/arduinowifly/files/ credit goes Twaldock for making this library and examples, for more information go to http://arduinology.tumblr.com/ ,also download NewSoftSerial, Streaming, Time and PString libraries from http://arduino.cc/en/Reference/Libraries
- Add the WiFly and the other libraries to your Arduino library folder and restart your Arduino IDE, you now should see the library and examples.
- To test the WiFly and library open one of the examples that came with the library, for this tutorial I will use the WebTime example, this one send html of the current time to your browser.
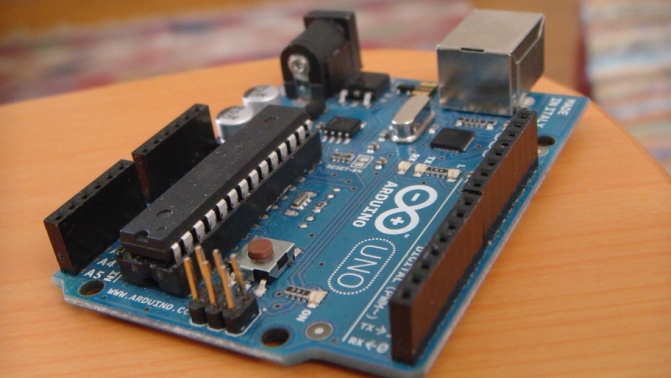
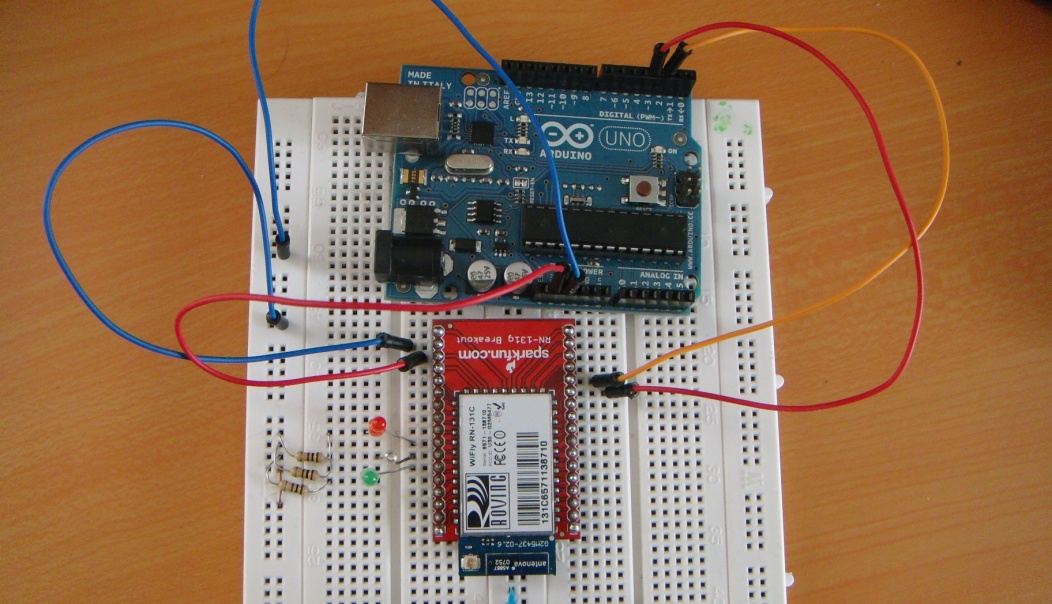
- Now connect the WiFly board to the Arduino, connect the Tx of the WiFly to the Rx of the Arduino and the Rx of the WiFly to the Tx of the Arduino (don’t use Pins 0 and 1 or any reserved Pins) for the sake of this example connect the Tx to the Pin 2 and Rx to Pin 3 on the Arduino. Connect the VDD-BATT on the WiFly to the 3.3V on the Arduino and the GND to GND.
- Back to the WebTime sketch, modify the first couple of lines of code to your SSID and Passphrase if there’s any, and modify the TX and Rx pins according to your setup.
- now add this function to example, this function adjust the configuration of the WiFly in order to make it connect to your Access Point or Ad-Hoc connection
boolean initSettings()
{
WiFly.SendCommand("set wlan auth <value>","AOK");
//WiFly.SendCommand("set wlan key <value>","AOK");
WiFly.SendCommand("set wlan channel <value>","AOK");
WiFly.SendCommand("set wlan join <value>","AOK");
WiFly.SendCommand("set dhcp <value>","AOK");
WiFly.SendCommand("save","AOK");
WiFly.SendCommand("reboot","AOK");
}
- instead of <value> a real value should be entered
- for the first line of code WiFly.SendCommand("set wlan auth <value>","AOK") this is for the authentication type replace <value> with
- 0, Open
- 1, WEP-128
- 2, WPA1
- 3, Mixed WPA1&WPA2-PSK
- 4, WPA2-PSK
- 5, Not Used
- 6, Adhoc, Join any Adhoc network
- You don’t need to do this step unless you chose WEP-128 in the authentication type then you must enter this line WiFly.SendCommand("set wlan key <value>","AOK") where the value is the HEX key.
- WiFly.SendCommand("set wlan channel <value>","AOK"), 1-13 is the valid range for a fixed channel. If 0 is set, then scan is performed, using the ssid.
- The WiFly.SendCommand("set wlan join <value>","AOK") sets the policy for automatically joining/associating with network access points. This policy is used when the module powers up, including wake up from the sleep timer.
- 0,, Manual, do not try to join automatically.
- 1, Try to join the access point that matches the stored SSID, passkey and channel. Channel can be set to 0 for scanning.
- 2, Join ANY access point with security matching the stored authentication mode. This ignores the stored SSID and searches for the access point with the strongest signal.
- 3, Reserved – Not used.
- 4, Create an Adhoc network, using stored SSID, IP address and netmask. Channel MUST be set. DHCP should be 0 (static IP) or set to Auto-IP with this policy. (unless another Adhoc device can act as DHCP server) add the ip and netmask
- WiFly.SendCommand("set ip address 169.254.1.1","AOK");
- WiFly.SendCommand("set netmask 255.255.0.0","AOK");
- Also set channel to 1, WiFly.SendCommand("set wlan chan 1","AOK");
- Last line in the configuration process WiFly.SendCommand("set dhcp <value>","AOK"); which set the DHCP
- 0, DHCP OFF, use stored static IP address
- 1, DHCP ON, get IP address and gateway from AP
- 2, Auto-IP, generally used with Adhoc networks
- 3, DHCP cache mode, Uses previous IP address if lease is not expired (lease survives reboot)
- You need to save and reboot each time you configure the WiFly Wlan options thus the WiFly.SendCommand("save","AOK") and WiFly.SendCommand("reboot","AOK");
- Now add initSettings() as the first line of a function called Reconnect();
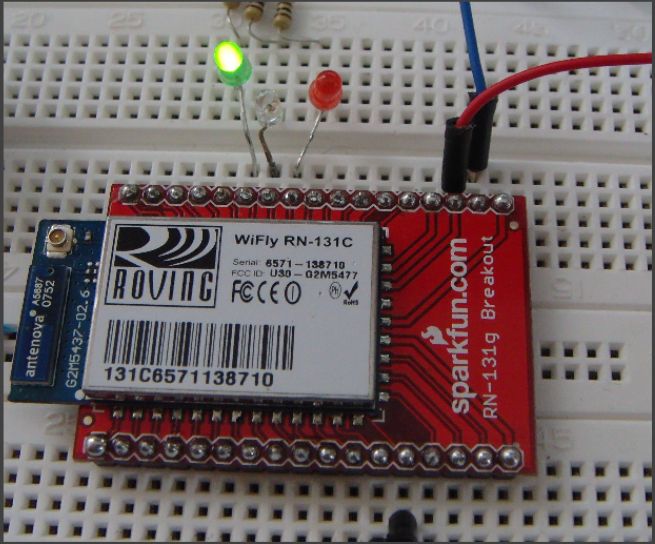
- That’s it, upload the WebTime Sketch to your Arduino and see if it works, if you connected the green, yellow, red LEDs to the PIO4, PIO5, PIO6 respectively of the WiFly you should see its status
- Red LED
- Fast blinking, not connected to wireless network
- OFF, Connected
- Yellow LED
- With each blink it means its either sending or receiving data from Tx or Rx
- Green LED
- ON Solid, connected over TCP
- Fast Blink, no IP address
- Slow Blink, IP address OK
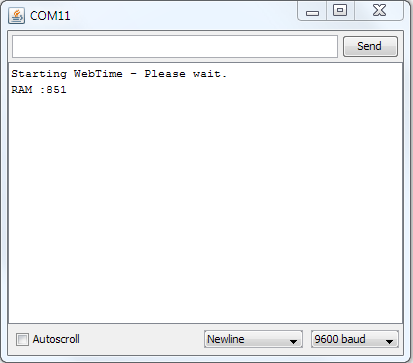
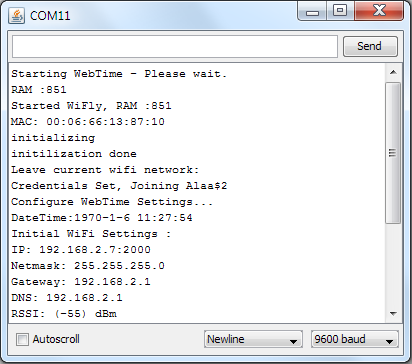
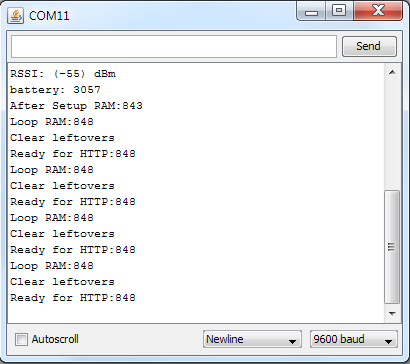
- After uploading the Sketch open the serial monitor to see the Arduino activity, it should display “Starting WebTime - Please wait.” and then “Free memory= <value>” and then stops for about 10 sec or more and the continue, if it doesn’t continue the means you have something wrong in your connection between the Arduino and WiFly and it’s not receiving data
- After it continues you should see quite a lot of lines coming up on your serial monitor if it connected successfully you should see your IP address that has been assigned to the WiFly and the Green LED is slowly Blinking while the RED LED is OFF, if you find your IP address to be 0.0.0.0 then the WiFly failed to connect to your wireless network and that you may have configured it wrong.
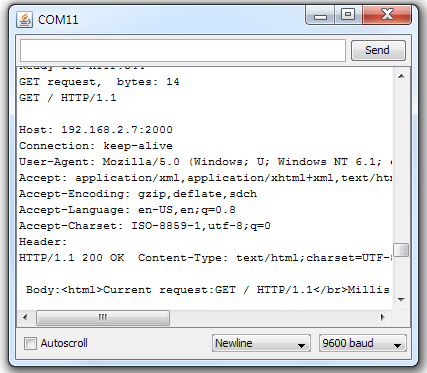
- When you see ready for HTTP in the serial monitor, go to your browser and enter the IP address found in the serial monitor and add port 2000 to it (xxx.xxx.xxx.xxx:2000).
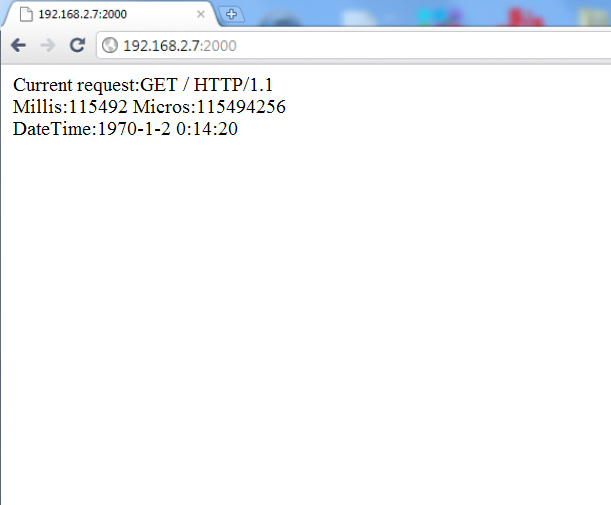
- You should see some activity in the serial monitor and the browser should show you some data about current time
- If all works right for you, you can remove the initSettings() function as this is only need to be run once to configure the WiFly and you won’t be needing it anymore
- For more information about the commands that can be sent to the WiFly check the WiFly Command Reference Manual http://www.sparkfun.com/datasheets/Wireless/WiFi/WiFlyGSX-um2.pdf
- Good Luck and Have Fun
Subscribe to:
Posts (Atom)